Building upbow into the guitar neck
Issue 226 September 25, 2014
If you turn the truss rod and nothing happens, the trouble could have been built into the neck at the factory. The time to avoid it is when you glue on the fingerboard. Dan Erlewine shows how to fix this problem before it happens.
- Single- and double-action truss rods explained
- How much relief to build into a neck?
- Prop up the peghead before the glue goes on
- Warming your workspace with hot lights before applying hot hide glue
Video Transcription
[on-screen text reads: Trade Secrets! Stewart-MacDonald]
Dan Erlewine: I'm about to glue the fretboard on this neck I'm making, and I'm going to show you how I do it.
Building up-bow into the neck
It's dead flat. There's no tension on the rod, it's just snug. The surfaces are sanded and clean, but I don't want to glue it on this way. What I want to do is force this neck into a slight up-bow, maybe 25 or 30 thousandths, and glue it on that way. See the gap in there?
[Dan holds a straightedge down on the neck and lifts up the peghead until there is a gap between the straightedge and the neck]
Then when it's dry, I'll have a slight bow in the neck that I will remove with the truss rod. Gaining control of the neck, I'd be able to tighten the neck into a back bow or loosen it into relief.
Single action rod vs dual action rod
The single action rod only moves the neck backwards against the pull of the strings [on-screen text reads: Traditional Truss Rod]. If you build it right, you have that tension, and you can loosen the rod and have it straight. Loosen it a bit more and let the strings pull it into an up-bow. The dual action rod [on-screen text reads: Hot Rod Truss Rod] can tighten the neck this way, relax it to neutral, and then push it up this direction regardless of the string pull.
[on-screen text reads: Many truss rods to choose from - Truss Rods at StewMac]
And over the years, I've seen lots of factory guitars come in with a single action rod that wasn't built as carefully as what I'm showing you here. And if it develops a little back bow in the wood or from the glue job, it comes into my shop because it's buzzing on the hump. And low and behold, I find that the truss rod is loose. There's no tension. That's a problem. I can't loosen it and let it pull up into relief. All I can do is tighten it really tight and get a big hump, and level that out with the fret job. And that's a lot of work.
Prop up the peghead
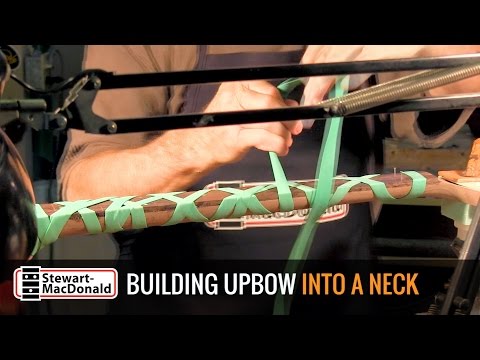
I've got the tenon clamped tightly in an Angle Vice here, and I have the up-bow pushed up about 24 thousandths. I'm using a Scissor Jack to push up on the peghead, but a stick of wood would work. And then I come in with a clamp from the top of the peghead, just to hold it firm. Keep the peghead from twisting and give me rigidity because I'm going to wrap this board on with a Rubber Clamping Band.
Glue the fretboard to the neck
I've drilled four locating holes in the fretboard. Two holes in the first fret slot and two holes down at the 19th fret to keep this board aligned so it won't shift side to side. And I just tap them gently in place [on-screen text reads: Your go-to hammer - StewMac Deadblow Fretting Hammer]. This is with the 22 or 24 thousandths relief pushed up into it because I want to even drive these nails in while it's under tension. And that's what this little jack is, just to help me support at that end.
You only have about two minutes before hot hide glue starts to gel on you. And if it gels, then you have to warm it up and start all over. So I warm up with the fretboard and the neck using desk lamps or the video lamps. Sometimes the heat gun. In the winter, even an oil filled heater, to get them warm. Over a hundred degrees, maybe around 110. Then the glue job can last a little bit longer. The glue won't set so fast.
I let it dry overnight. I probably could have unclamped it in five or six hours, but I wouldn't have put tension on the truss rod that quick. So overnights good for something like that. I'm looking forward to getting on with this job.
Adjust and measure neck relief
Let's see how we came out here. Got a nice little up-bow in there [Dan sets a Precision Straightedge on the neck to measure the up-bow]. That's what I wanted. I can tighten the truss rod and get rid of the bow. I can keep on going into a nice back bow. See the hump? It's right in the center. Losening it back straight. This will really show it. This is a Relief Gauge [Dan sets a relief gauge on the fretboard]. Watch the action here [the relief gauge reading goes from 0 to 10 as Dan adjusts the truss rod]. That's control. Isn't that cool?