Pandora's Box - Luthier Tips du Jour Mailbag
In this episode, Robbie O’Brien shows how to use a steam box to aid in bending a cutaway guitar side.
Video Transcription
[on-screen text reads: Luthier Tips du Jour Mailbag]
Mailbag question: Can you offer any tips to help increase my odds of bending sides for an OM model with a cutaway successfully?
Robert O'Brien: Today's Tips du Jour Mailbag question comes to us from Colorado. "Dear Robert, I have a high dollar set of Brazilian rosewood that I need to bend. I want to do an OM model with a cutaway. I've bent sides before, but this one makes me nervous. Can you offer any tips or advice to help increase my odds of bending the side successfully?" Karen from K2 Guitars in Golden Colorado.
So Karen, my pucker factor goes up just hearing about this. Bending any high dollar set of wood, no matter what the species, really makes me nervous and you're doing a cutaway. So yes, there are some things you can do to help increase your odds. One of the techniques I'm going to show you today, I recently learned while I was visiting Dave Nichols from Custom Pearl Inlay in New York. I've used this technique on several guitars and I think it really will help increase your odds of bending successfully. So let me show you how to do it.
Gluing the sides
So here's the high dollar set of Brazilian that Karen has brought to me. Since she lives in Colorado and I live in Colorado, I invited her over to the shop and we're going to attempt to bend these sides together. Now they've already been thicknessed, they're sitting at 2 millimeters thick, they're very flexible. However, when we were inspecting the sides, I noticed that there's some knots here that look pretty nasty and they're right around the waist area and I want to stabilize those before we actually go to the bender. So what I'm going to use is my CA glue, I use the hot stuff brand from Satellite City, and I'm just going to put a little bit in there. Then I'm going to come in with sandpaper over the top and just kind of create some sawdust and that will help fill the void. And if I'm lucky, I can stabilize that area there before it wants to let loose during the bend [Robert pours a little more CA glue into the knot and sands it some more].
And I have exactly in the same location on the other one, a little defect as well. So I'm going to do the same thing. I'm using the thin viscosity, so if there's any little hairline cracks or something, this glue will wick into it [Robert pours some CA glue into the defect area and sands it]. Now I know what you all are thinking. You're thinking, well wait a minute, won't the glue let loose under the heat from the bend? Well, yeah, probably. I feel a little better doing this and hopefully it will increase my odds of doing this successfully, but I'm not real worried about it. These are Karen's sides, not mine, so ... I'm kidding. I'm kidding, Karen. Now when you're doing this, folks try not to glue your hand to the sandpaper. It does happen.
So now I have the voids filled and the wood hopefully is a little more stabilized so that when we bend it, that won't just completely crack. Now you need to figure out what's going to be your left and your right side. So use your form oriented on the form for left and right. And the cutaway area, some people like to thickness that a little thinner than the rest of the waist. I've gone as low as 1.6 on the cutaway portion of the side. Right now these sides are at two, and I feel pretty confident we can do it at two. I'm not going to thin this area down any, and if you're a betting person, now's probably the time. If you're of the religious persuasion, now's probably also the time. So what I'm going to do is show you the trick I learned with Dave Nichols.
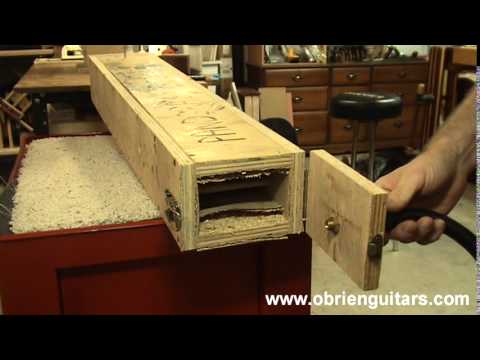
Pandoras box
So here's the trick I learned. I'm going to be using a steamer to steam the wood before I actually put it in the bender. What I'm going to use for the heat source for the steam is this little unit that I got from Rockler. I've also made myself a steam box and I've appropriately named it Pandora's Box. One end of the box is open, it's got a hinged door and I've screwed one end of the steam creator, the hose goes on there, and inside there I've got dowels running so I can place the wood in there so it doesn't sit on the bottom of the box. It's suspended in the middle there. Now I recommend, this is my prototype, so I recommend when you make yours you use pressure-treated plywood obviously, or pressure-treated lumber. It will last a lot longer. Mine's starting to disintegrate, but since this is a prototype model, I'm not too worried about it.
To measure the temperature on this end of the box, the other end from the door, I've got just a meat thermometer in there and I'm also going to elevate this into the box. The idea is that the steam is going to rise and come up here and as it cools, it circulates around the wood. So after a few minutes, my steam is full blast here. So I'm going to go ahead and place this side in here. I've already spritzed it. I like to get a lot of moisture on there before it actually gets inside there and the steam in there will help it. Going to place it in there on top of the dowels. In it goes.
And something else I've learned over the years that hey, go ahead and put your bindings in there too. Why try and do it twice? So we put the bindings in. I figure if you're going to break a set of sides, you might as well break the bindings at the same time. And now just close up Pandora's Box and I like to leave it in there about 10 or 15 minutes. Here in Colorado, because of the altitude, I'm about 5,200 feet, about the best I can do is 200, 205 degrees Fahrenheit.
All right, it's been about 10 minutes, so I'm going to carefully open this. Be careful, it is under a little bit of pressure and the steam can really burn you badly. So I've got gloves on. Safety first, boys and girls. And I'm now going to pull the side out, and this thing is already starting to be very, very flexible. So I'm now going to make my sandwich and install it into the bender.
Bendering
So I've got the side into the bender. What I did is spring steel underneath, sides wrapped in aluminum foil, spring steel on top, and then my blanket. I'm controlling the temperature with my LMI temperature controller. I've got my temperature set for 325 degrees Fahrenheit and it is slowly heating up. I just passed the boiling point. I can hear it start to sizzle inside there. I'm going to start by bending the cutaway area and then as I get it bent, I'll bring the waist down a little bit at the same time and then finish it off once the cutaway area is bent. Okay, one other little thing that helps ensure success is a heat gun. And so I'm going to ask Karen to go ahead and heat this area here and underneath there and get it really nice and hot.
Just underneath here if you can. So I'm asking Karen to get right up in there in that area that's going to really get bent, where the stress is. All right, so I'm slowly cranking down the waist as I work. Every now and then I'll come in and give a little bit right here. And pucker factor is pretty much on a scale of one to 10, about a 12 right now. Okay, come in and hit me from the top side there. And about every 15 seconds or so, I give it about a half turn. Yep, get back up inside there if you can. Make sure we got good heat transfer. That's the secret. And we're about halfway through it at this point. I've already bent the lower bout. That was already hot enough so I went ahead and just pulled that on down. That was no problem. It's the cutaway area that gives us all the trouble.
And slowly but surely we're making our way down there and we're getting pretty close to being done here. Slowly bringing this thing down. [inaudible 00:08:07] bringing it down and it's about another half inch to go or so. So we're getting really close. Pucker factor has diminished a little bit. We're down to about 11 on a scale of one to 10 now. Now the reason why I like to leave the waist undone and start with the cutaway is because there's less stress up here. Go ahead and start this area when it's almost done, then go ahead and pull this on down and that puts a little less stress in that cutaway area.
All right, I think we're there. I've got the cutaway section clamped all the way down. I've got the waist section clamped all the way down. Now you don't want to kill it when you torque these things off because you can smash your bindings that are in there and get them too thin. I had a friend once that that happened too, so try not to do that. One of the good things about using the heat gun here is that it makes so much noise that if the sides were to break, you won't hear them crack. You'll find out later.
All right, now what I'm going to do is turn the temperature controller down to about 260 and I'm going to set my timer for about 10 or 15 minutes and hopefully just lock in that cellular structure so I have less spring back. And then I'll shut it off and let it cool down to room temperature. In the meantime, I can go ahead and start steaming the other side. When this one comes out, the other one's ready to go. Such efficiency. Karen, how's the pucker factor?
Karen: I'm all right.
Robert: Has it come back down below 10 yet?
Karen: Yeah.
Disassembly
Robert: Good. Alrighty. So we've let this thing sit at 260 degrees for about 10 or 15 minutes, and now we're slowly going to take this thing apart and see if we have any surprises. This is like Christmas morning here folks, and there is a bit of spring back because of the spring steel that's in there. So you have to be really careful as you take this thing apart. I am going to try and help support it a little bit here so it doesn't just totally spring back. You kind of have to disassemble your bender because it's all curved now, you have to slide everything out nice and carefully here. And we have one bent side and two bent bindings and I don't feel any surprises in there, but let's open this thing up and see what we get. We've got a lot of resin that cooked out of this. This is a piece of Brazilian rosewood that had a lot of resin in it. Not a big deal. That should all just scrape off.
It literally is like Christmas morning. Look at that. I'm opening up the wrapping paper there and there we have one bent cutaway side and two bent bindings in the cutaway shape. So life is good, Karen, let's celebrate.
Karen: Yay.
Robert: All right, Karen, we have got a cutaway side and two cutaway bindings, absolutely no spring back whatsoever. Also, no ripples. Now, that was my fear by using this method, if we would get ripples in it. And there's no ripples whatsoever and no cracking, no flat spots. Just a textbook example of how to bend a cutaway. So thank you very much for your email, Karen, and thanks for dropping by the shop today and bending some sides with me. Good luck.
[on-screen text reads: More Luthier Tips and online courses available at www.obrienguitars.com. Private and small group guitar building and finishing instruction available.]